Unit 2- Practical Scientific Procedures and Techniques
Institution
PEARSON (PEARSON)
Unit 2 Practical Scientific Procedures and Techniques Assignment B - Undertake calorimetry to study cooling
curves
I was awarded a DISTINCTION for this assignment.
Unit 2- Practical Scientific Procedures and Techniques
All documents for this subject (369)
9
reviews
By: tazkia3344 • 1 year ago
By: lybahkouser • 1 year ago
By: zaynababdi003 • 1 year ago
By: aliyaldn2020 • 1 year ago
thanks
By: slagrin753 • 1 year ago
By: izzyfaine • 1 year ago
By: stremimogwo2 • 1 year ago
Show more reviews
Seller
Follow
steviejadev
Reviews received
Content preview
UNIT 2 Practical Scientific Procedures and Techniques:
Assignment 2 Cooling Curves - Stevie-Jade Vickers
P3 and P4
What is a cooling curve?
Substances can go through various changes of states which are reversible. These changes of states
include freezing (liquid to solid), melting (solid to liquid), condensing (gas to liquid) and boiling (liquid
to gas). These changes of state can be observed by measuring the temperature as substances change
states. Cooling curves are a way of measuring the rate at which substances cool down, as it is often
much easier to measure the temperatures of a substance as they cool down rather than as they heat
up. Cooling curves are presented as a smooth curve on a graph which shows the temperature of a
substance and after how many minutes/seconds into the cooling process the substance reached this
temperature. The curve produced for some substances will show at a point that the temperature
remains constant. This is indicative of the change of state (i.e., freezing). When representing the
point at which the substance changes state and, in this example, freezes, this line will also give the
melting point of that substance.
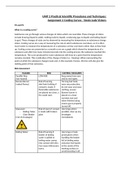
Risk Assessment
HAZARD RISK CONTROL MEASURES
Paraffin Wax LOW RISK Keep away from eyes
(low hazard) and do not ingest.
Bunsen Burner Risk of burning Tie long hair back,
(naked flames) skin/hair/clothing if wear eye protection,
contact is made. If do not wear any loose
flammable substances clothing, ensure
are placed too close, a Bunsen burner is
fire could start. placed on a heat
resistant mat and
when finished using,
ensure gas is properly
turned off.
Glassware Risk of injury if contact Use tongs where
- Boiling Tubes is made with broken possible, clear up any
- Glass Beaker glass breakages
(risk of breakages) immediately.
Boiling Water Risk of burning if Use tongs or heat-
beaker of boiling proof gloves when
water is spilled or handling the beaker
boiling water comes full of boiling water
into contact with skin. and place hot liquids
Can cause mild-severe in the centre of the
burns. working surface to
avoid knocking it off.
, Calibration of a Thermometer
I set up my apparatus by attaching a clamp to a clamp stand. I then clamped the digital thermometer
to the clamp stand. I filled a 250cm3 beaker with ice that was crushed and added a small amount of
water to the beaker. I used a glass rod to stir the crushed ice and water and then proceeded to wait
for 3 minutes for it to stand. Once the time was up, I placed the digital thermometer in the centre of
the beaker, ensuring it did not touch the sides or the bottom of the beaker. After 30 seconds, I
recorded the temperature. I took the thermometer out of the beaker and waited for the
thermometer to adjust to room temperature (which was about 20 degrees Celsius) before repeating
those steps twice more. I repeated this procedure for both the alcohol in glass thermometer and the
mercury in glass thermometer and took three readings for each.
For the next stage of the calibration, I set up the clamp and clamp stand also. I set up a Bunsen
burner on a heatproof mat which I placed under a tripod. On top of the tripod, I placed a gauze mat.
I clamped a digital thermometer to the clamp stand and then I poured 100cm3 of water into a
250cm3 beaker. I then placed the beaker on the gauze mat and turned the gas for the Bunsen
burner on. I waited for the water to reach boiling point and then placed the thermometer in the
centre of the beaker, once again making sure it did not touch the bottom or the sides of the beaker.
After 30 seconds, I recorded the temperature. I removed the thermometer and waited until it
reached room temperature before repeating these steps two more times. I repeated this procedure
for both the alcohol in glass thermometer and the mercury in glass thermometer.
I followed this procedure three times for each type of thermometer and calculated the average
temperature of the water read by each type of thermometer.
Temperature (0C) Average
Thermometer Temperature
1 2 3
(0C)
Alcohol in glass
97.5 96.6 98.5 97.7
thermometer
Mercury in
100 100 101 100.3
Boiling Water glass
Digital
Thermometer 96.5 96.6 97.5 96.9
Alcohol in glass
4.0 0.5 0 1.5
thermometer
Mercury in
3.0 1.0 0 1.3
Ice glass
Digital
Thermometer 1.4 1.6 0.9 1.3
Choosing a Thermometer
To choose which thermometer was best to use, I looked for the average temperatures which were
closer to the melting points and boiling points of water. The melting point of water is 0 degrees
Celsius, and the boiling point of water is 100 degrees Celsius. Looking at the results from the
thermometers in boiling water, I could see that the average result given by the mercury in glass
thermometer is closest to the actual boiling point of water than any other of the thermometers.
However, both the mercury in glass thermometer and digital thermometer in ice gave the same
average melting point temperature which, although not accurate, are closer than the temperature
The benefits of buying summaries with Stuvia:
Guaranteed quality through customer reviews
Stuvia customers have reviewed more than 700,000 summaries. This how you know that you are buying the best documents.
Quick and easy check-out
You can quickly pay through credit card or Stuvia-credit for the summaries. There is no membership needed.
Focus on what matters
Your fellow students write the study notes themselves, which is why the documents are always reliable and up-to-date. This ensures you quickly get to the core!
Frequently asked questions
What do I get when I buy this document?
You get a PDF, available immediately after your purchase. The purchased document is accessible anytime, anywhere and indefinitely through your profile.
Satisfaction guarantee: how does it work?
Our satisfaction guarantee ensures that you always find a study document that suits you well. You fill out a form, and our customer service team takes care of the rest.
Who am I buying these notes from?
Stuvia is a marketplace, so you are not buying this document from us, but from seller steviejadev. Stuvia facilitates payment to the seller.
Will I be stuck with a subscription?
No, you only buy these notes for $9.37. You're not tied to anything after your purchase.