4.4.3 Lab: Optics Dry Lab
Physics Sem 2 Name:
Points Possible:50 Date: 4/29/2021
Optics
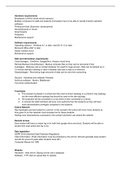
Materials:
Optics bench
Optics kit, including a lens/mirror mount
Convex lens of known focal length
Concave mirror of known focal length
Light source/candle
Screen
Meter stick/metric ruler
Two polarized films
Prism
Laser pointer
Protractor
Graph paper
Electromagnetic spectrum chart
,Materials for Exploring Further:
Plane mirror
Ripple tank, with sheet of plastic or glass that fits on part of the bottom of the tank, and
objects that can be used as boundaries to obstruct the pathway of waves
Wave-motion rope
Tuning-fork kit
Stroboscope
Resonance-tube kit
In this lab, you will investigate the relationship between the focal lengths of a mirror and lens
and the type of image that is generated.
Procedure
Part 1: Image from a Lens
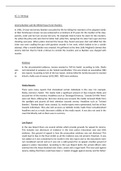
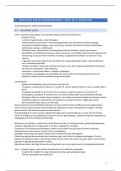
1. Place the light source, convex lens, and screen on the optics bench as shown in figure 1. Start
with the light source at a distance greater than 2ƒ from the lens.
, Figure 1
2. Measure the height of the light source, or "object" (ho), and record it in data table 1. Also
measure and record the distance between the lens and the light source (do) in the data table.
Using the lens equation and the given focal length, calculate the distance from the lens to the
image (di) and the height of the image (hi): and .
Record your calculations in the "Calculated" section of data table 1.
3. Keeping the light source and lens in the same position, turn on the light source and adjust the
screen until a clear, real image is formed on the screen. Measure the experimentally
determined di and hi, and record your observations in the "Experimental" section of data table 1.
4. Place the light source a distance of exactly 2ƒ from the lens. Record the distance between the
lens and the light source (do) in data table 1. Using the lens equation and the given focal length,
calculate the distance from the lens to the image (di) and the height of the image (hi). Record
your calculations in the "Calculated" section of data table 1.
5. Turn on the light source, keeping it 2ƒ from the lens, and adjust the screen until a clear, real
image is formed on the screen. Measure the experimentally determined di and hi, and write your
observations in the "Experimental" section of data table 1.
6. Place the light source at a distance of somewhere between ƒ and 2ƒ from the lens. Record the
distance between the lens and the light source (do) in the data table. Using the lens equation and
the given focal length, calculate the distance from the lens to the image (di) and the height of the
image (hi). Record your calculations in the "Calculated" section of data table 1.
7. Keeping the light source and lens in the same position, turn on the light source and adjust the
screen until a clear, real image is formed on the screen. Measure the experimentally
determined di and hi, and write your observations in the "Experimental" section of data table 1.
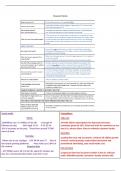
Data Table 1
ho = 1.5 cm
Calculated Calculated Experimental Experimental
results results results results
ƒ = 25 cm
di hi di hi
Greater than 2ƒ
do = 54 cm >46cm -.56cm 46.4 cm 1.3 cm
2ƒ 48cm -.64cm 49.5 cm 1.4 cm
Physics Sem 2 Name:
Points Possible:50 Date: 4/29/2021
Optics
Materials:
Optics bench
Optics kit, including a lens/mirror mount
Convex lens of known focal length
Concave mirror of known focal length
Light source/candle
Screen
Meter stick/metric ruler
Two polarized films
Prism
Laser pointer
Protractor
Graph paper
Electromagnetic spectrum chart
,Materials for Exploring Further:
Plane mirror
Ripple tank, with sheet of plastic or glass that fits on part of the bottom of the tank, and
objects that can be used as boundaries to obstruct the pathway of waves
Wave-motion rope
Tuning-fork kit
Stroboscope
Resonance-tube kit
In this lab, you will investigate the relationship between the focal lengths of a mirror and lens
and the type of image that is generated.
Procedure
Part 1: Image from a Lens
1. Place the light source, convex lens, and screen on the optics bench as shown in figure 1. Start
with the light source at a distance greater than 2ƒ from the lens.
, Figure 1
2. Measure the height of the light source, or "object" (ho), and record it in data table 1. Also
measure and record the distance between the lens and the light source (do) in the data table.
Using the lens equation and the given focal length, calculate the distance from the lens to the
image (di) and the height of the image (hi): and .
Record your calculations in the "Calculated" section of data table 1.
3. Keeping the light source and lens in the same position, turn on the light source and adjust the
screen until a clear, real image is formed on the screen. Measure the experimentally
determined di and hi, and record your observations in the "Experimental" section of data table 1.
4. Place the light source a distance of exactly 2ƒ from the lens. Record the distance between the
lens and the light source (do) in data table 1. Using the lens equation and the given focal length,
calculate the distance from the lens to the image (di) and the height of the image (hi). Record
your calculations in the "Calculated" section of data table 1.
5. Turn on the light source, keeping it 2ƒ from the lens, and adjust the screen until a clear, real
image is formed on the screen. Measure the experimentally determined di and hi, and write your
observations in the "Experimental" section of data table 1.
6. Place the light source at a distance of somewhere between ƒ and 2ƒ from the lens. Record the
distance between the lens and the light source (do) in the data table. Using the lens equation and
the given focal length, calculate the distance from the lens to the image (di) and the height of the
image (hi). Record your calculations in the "Calculated" section of data table 1.
7. Keeping the light source and lens in the same position, turn on the light source and adjust the
screen until a clear, real image is formed on the screen. Measure the experimentally
determined di and hi, and write your observations in the "Experimental" section of data table 1.
Data Table 1
ho = 1.5 cm
Calculated Calculated Experimental Experimental
results results results results
ƒ = 25 cm
di hi di hi
Greater than 2ƒ
do = 54 cm >46cm -.56cm 46.4 cm 1.3 cm
2ƒ 48cm -.64cm 49.5 cm 1.4 cm